We have a wide range of experience levels in this course, so the first lesson is devoted to setting up your working environment and laying down a good foundation for your projects. I would like to give everyone a chance to get everything installed and to get comfortable with these new tools before we dive in. I realize that some of you may have a lot of this done already. If you are interested in developing your skills in HTML and CSS, you can check a fantastic tutorial I linked on the Tutorials. You can access that page up top in the navigation bar. Let’s begin.
In this lesson you will install the tools that we need for the course. Once you have them installed, I would like you to dig around for a bit so that you get familiar with the interfaces and functionalities. Specific instructions can be found in each section below.
At the end, I offer some concluding remarks by sharing a brief story about how I got started using R Markdown for web products.
Course Goals & Overview
As I mentioned, our goals for this course are to build data-driven web products and host those products on GitHub. The project or projects you work on is up to you. If you don’t have any ideas yet, that’s ok. Each lesson will be built around adding functionality to your project. You will start with something simple and, hopefully, by the end have something badass. Some of you may have more experience with some of these tools than I do. That’s great–-you can help me and help your classmates. If you think something I say is wrong, please tell me. I would rather do something the right way than be right about the wrong way I am doing something.
The other thing I want to mention is that I assure you this in not a web development course. As you go through this lesson it may feel like that is where we are heading, but I promise it is not. Markdown is built on top of HTML and CSS so we will encounter these from time to time. I am interested in functional sites that contain useful content, with maybe a little bit of flair. I have found that even a superficial knowledge of web development and design goes a long way in building good R Markdown sites.
Course Projects
It is totally up to you what kind of project you work on; the sky is the limit. Some of you may have a firm idea of what you want to do, others may not. This is going to be a work in progress so don’t worry if your idea is a little unclear. We will all help you come up with a cool project idea. Here is your first assignment.
Assignment
Conceptualize a web project. It doens’t matter if you make an outline, draw a mind map, use a Trello board, whatever you like. Your assignment is to sketch out the concept; a) what information or story you want to present and b) how do you want to present it.
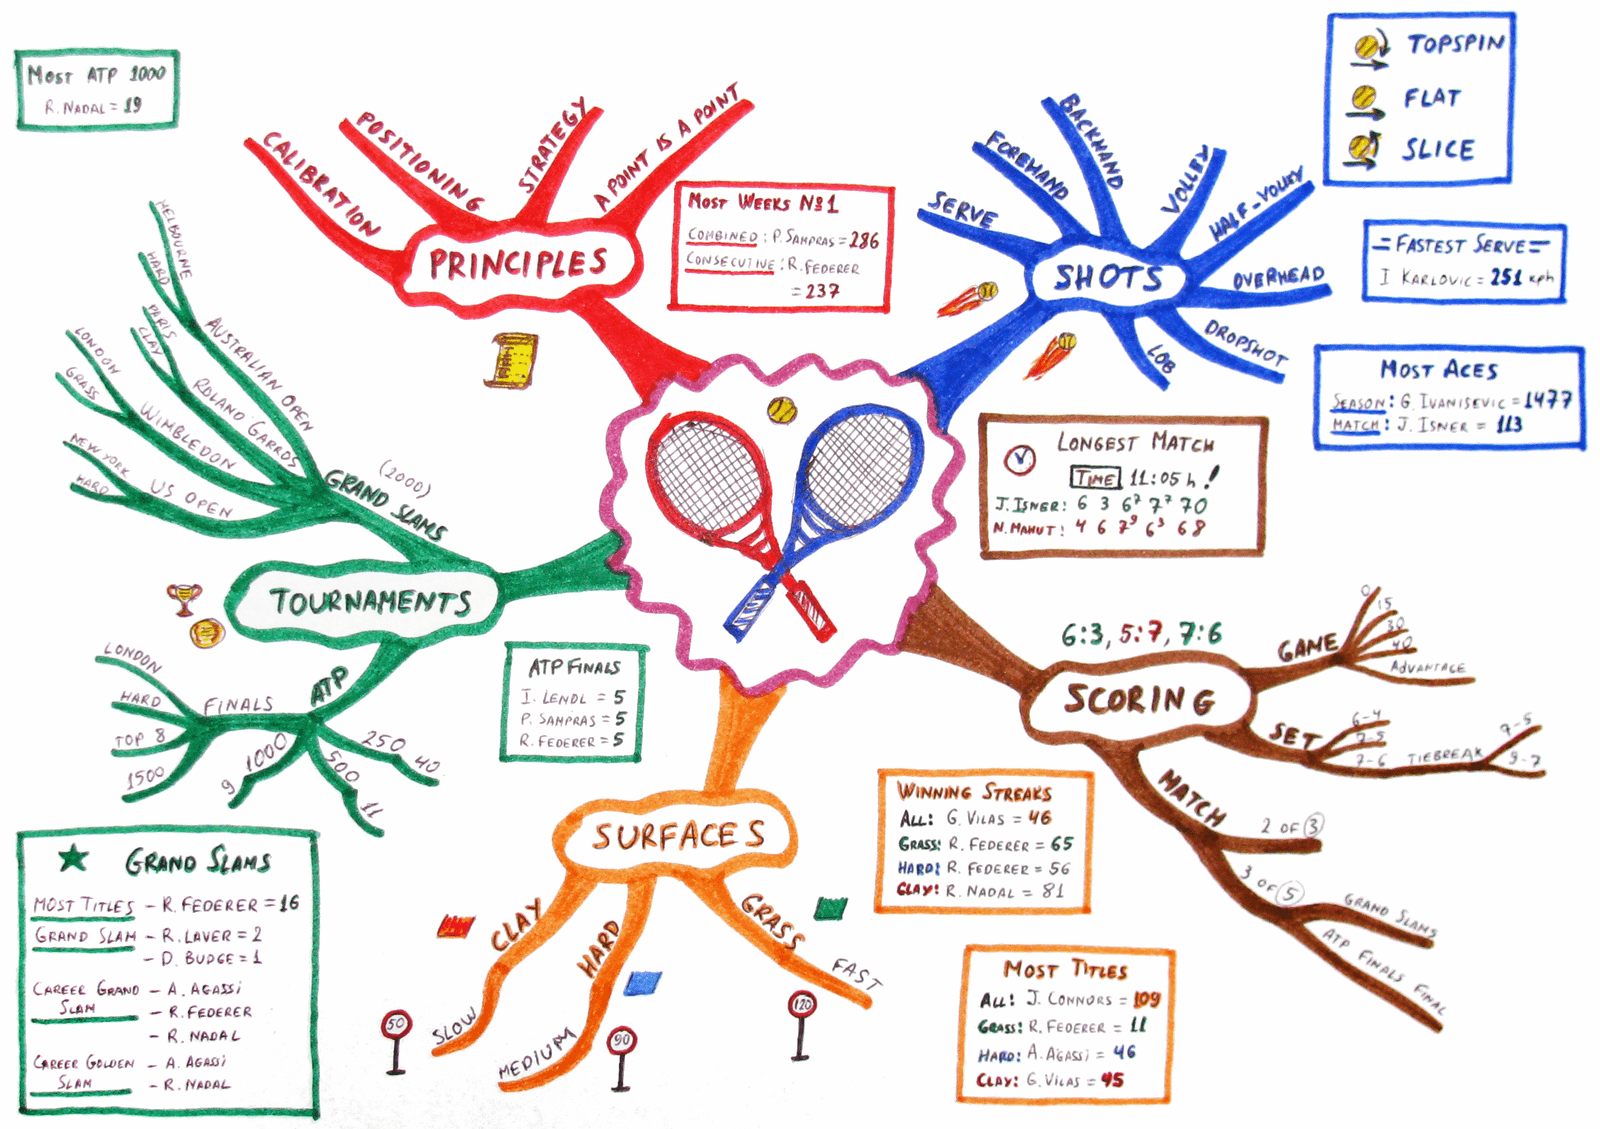
Tennis Mind Map by http://mindmapping.bg (source). Licenced under CC BY-SA 2.5. The Wikimedia Commons source page for the image can be found here.
)
Think about the content and organization of your project. Do you have images or tables? Do want to make figures and run code? Do you want to embed videos? Make a turtorial? Each piece of this puzzle will require specific tools and the more we can figure out now the easier it will be down the road.
Slack
By now you should have received an invitation to join our Slack Workspace. If you did not, please let me know. We set up this workspace to help facilitate community discussion and help maintain collaborative scientific pursuits during these truly strange times. We are using Slack as the primary communication platorm for the online courses. From this point on, we will use Slack for all course communications and interactions. If you need to get in touch with me privately, you can use Slack for that too. You will find more detailed instructions on how to use the platform when you log in. You should be directed to the #welcome channel, which contains information to help you get started.
Slack is vital tool for this course. Since we can’t leave our homes and my internet being what it is, at least for now Slack is our virtual seminar room. As the course moves forward we will try something like Zoom. If I gave grades in course, Slack participation would account for 20%. So please be preparred to interact. You should use Slack to ask and answer questions, propose learning objectives, discuss projects, recommend tools, etc.
Assignment
- Read the pinned post on the
#welcomechannel and perform the tasks listed at the bottom. - Join the the channel for our course,
#course-curation. On the#course-curationchannel you will find a post by me about Introductions. - Add your answers to these questions in the thread off that post. If you don’t know what a thread is go back to #1 and repeat :) This will help me and everyone else learn a bit more about your expertise. Please rate your skills on a scale of 1 to 5 (1 = no skills, 5 = skills). For example:
- Main area of research: Ethnobotany
- Computer operating system: MacOSX
- R skills: 3
- R Markdown skills: 2
- HTML/CSS/JS: 5
- Git/GitHub: 4
- Command line: 4
- Spanish: 5
- English: 5
Text Editors
The next thing you need is a good text editor. I will offer you some recommendations and general guidelines. The key thing to look for is a good source code editor. This means that if you tell the editor what language you are writing in (e.g., Markdown), the software will apply special syntax highlighting so you can easily distinguish types of code from regular text. A good editor will also have automatic code formatting, so you don’t have to keep writing the same code over and over.
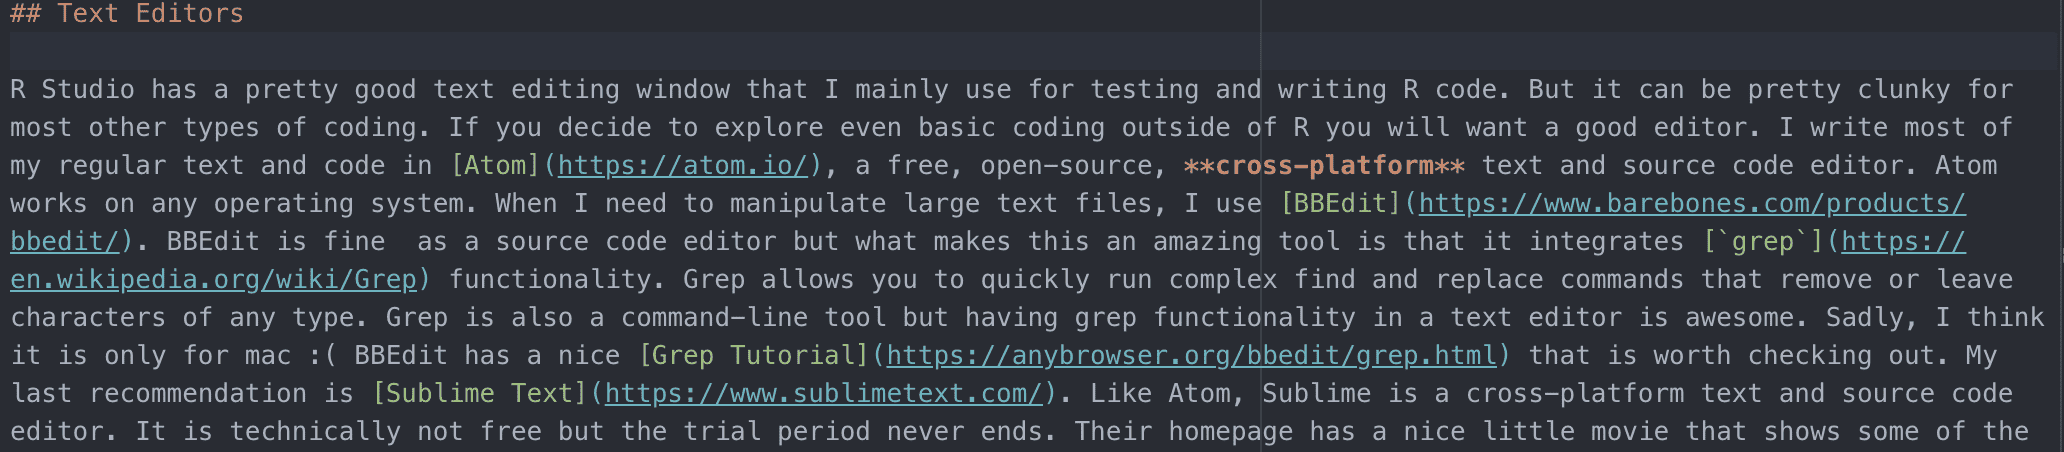
Syntax highlighting of the page in Atom. Notice how headers, bold text, and hyperlinks are formatted differently.
R Studio has a good text editing window that I mainly use for testing and writing R code, but it can be clunky for most other types of coding. I write my regular text and code in Atom, a free, open-source, cross-platform text and source code editor. Atom works on any operating system. When I need to manipulate large text files, I use BBEdit. BBEdit is fine as a source code editor but what makes this an amazing tool is that it integrates grep functionality. Grep allows you to quickly run complex find-and-replace commands that remove or leave characters of any type. Grep is also a command-line tool but having Grep functionality in a text editor is awesome. Sadly, I think it is only for Mac :( BBEdit has a nice Grep Tutorial that is worth checking out. My last recommendation is Sublime Text. Like Atom, Sublime is a cross-platform text and source code editor. It is technically not free, but the trial period never ends. So if you use it a lot, buy a copy. Their homepage has a nice little movie that shows some of the capabilities that I mentioned above. Please have a look.
Assignment
Get a good text editor or two. I want you to start playing around with these tools. If you search the internet for “Best text editors” there are a ton of articles. Here are a couple of articles to get you started. Windows specific Best Text Editor For Windows In 2019 and general Best text editors in 2020. Also check out this article on 14 Best Web Development IDE in 2020.
Once you have a good editor, head to this page. The link should take you directly to the source code for a single page R Markdown document on GitHub. Copy the code and paste it into your text editor or right click on Raw and select Save Link as, and give it a name like test.Rmd. The .Rmd extension will be recognized by RStudio so open the file in RStudio as well. Make sure to change the language to Markdown in your text editor. In most text editors there is a button on the bottom of the window where you can make a selection.
The content of the file is not important. What I would like you to do is look at the syntax formatting. Notice the text that is colored differently. The file is mainly a mixture of R code and Markdown. Depending on the text editor the R code may not color very well. If you open the file in RStudio you can see the code beter.
Now look at the actual web version of this file. Compare the two. Look at how any colored text from the raw file is formatted in the HTML version.
If you want to practice working in your new source code editor AND learn more HTML/CSS in the process, check out the Interneting is Hard tutorial by Oliver James linked in the HTML/CSS section on the Tutorials page (also linked in the navigation bar up top).
Atom
If you decide to use Atom check out the Atom manual.
A note from a Windows user
Markdown syntax highlighting in Atom is done by package markdown-language. In order to have syntax highlighting working properly, check that this package is installed. Go to Packages > Settings View > Install packages/Themes, find markdown-language and install if needed. The markdown-language package highlights markdown syntax for GitHub, R and other. Another useful package is markdown-preview. It can open a rendered preview of a markdown file, just hit ctrl + shift+ m.
Browsers
The next item on our list is a web browser with good developer tools. Not all web browsers are created equal in this sense so it’s good to have a few installed on your computer. Developer tools serve many purposes and are powerful allies for web designers. For our purposes, these tools will help us explore the underlying code of a site. Take a look at the window below. The box on the left is showing the CSS formatting for a blockquote (font family, font color, etc.) while the box on the right show the HTML code.
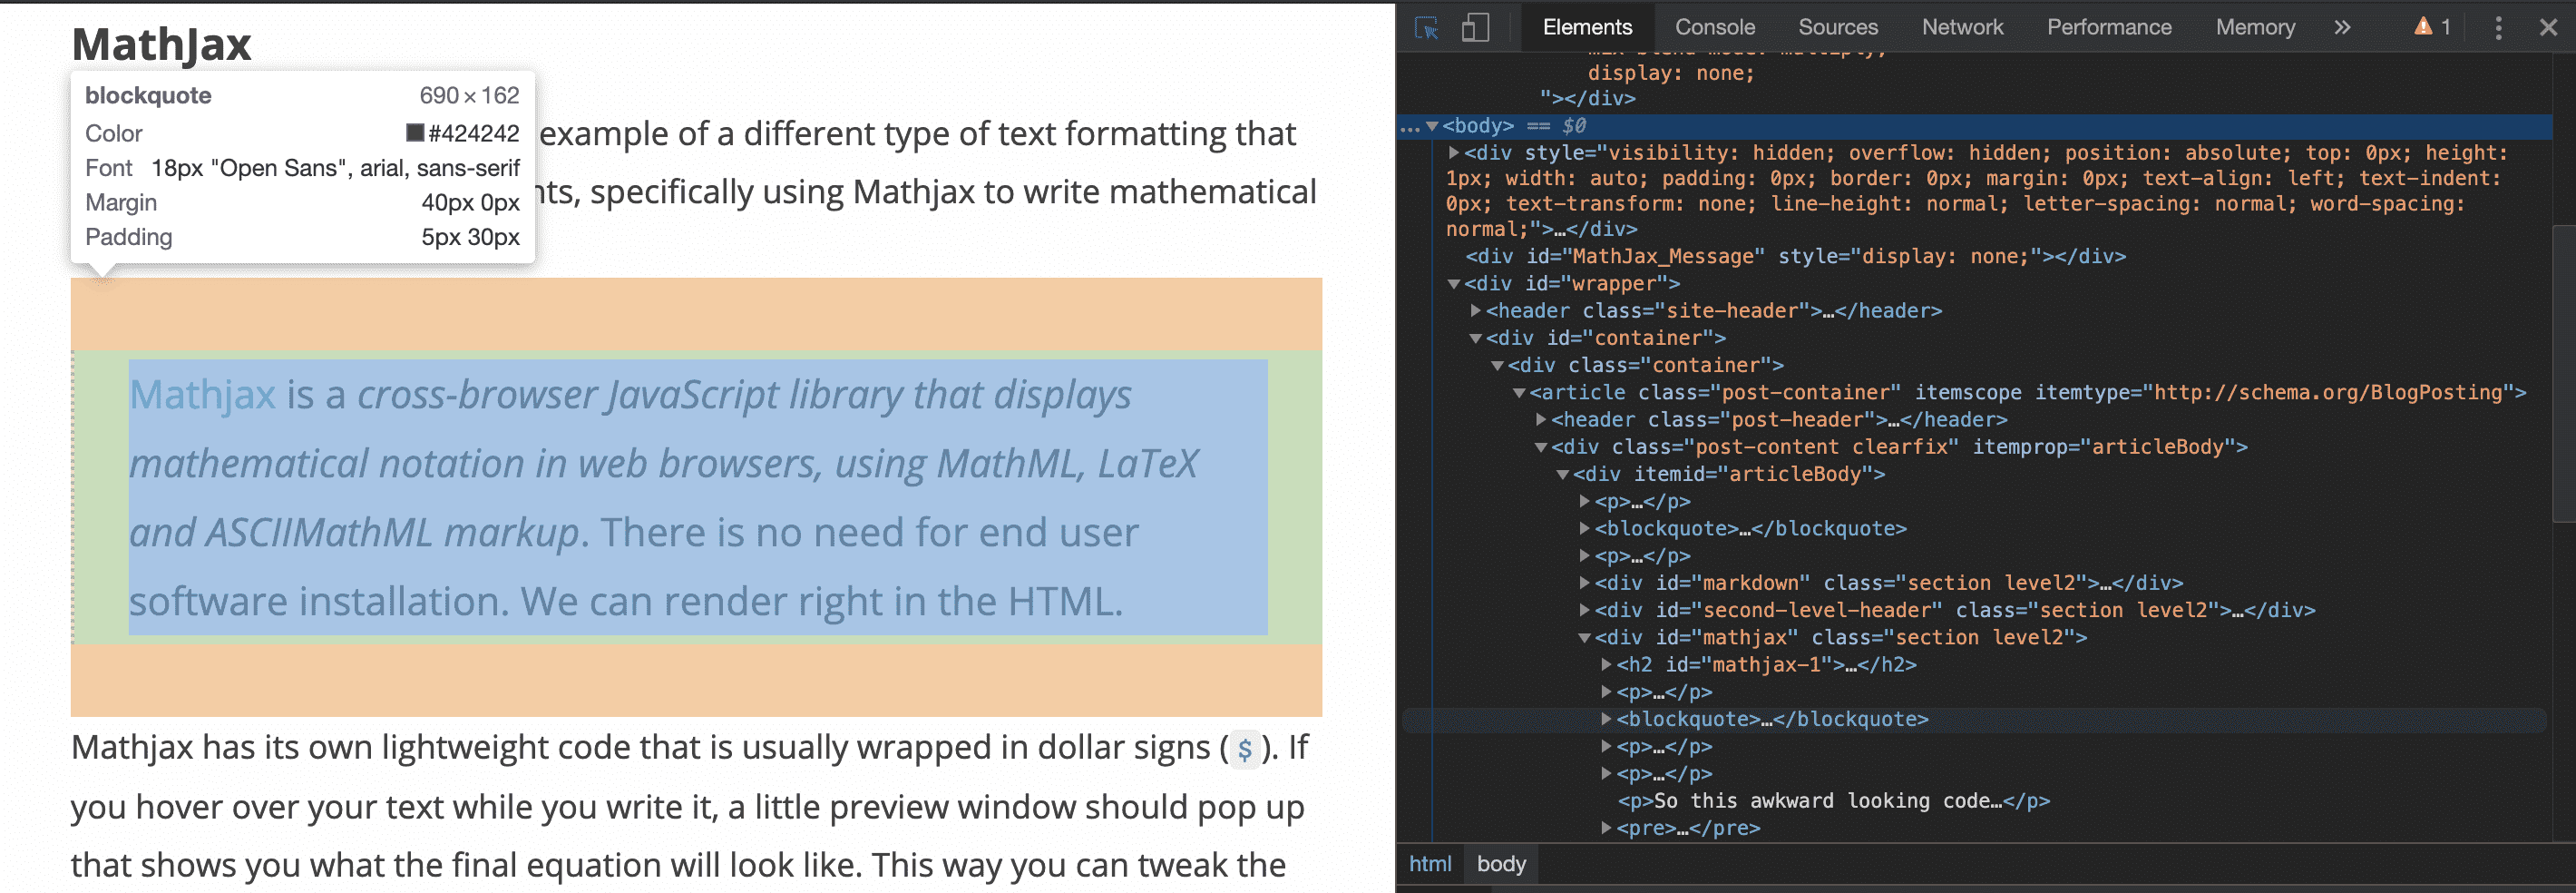
Image of Chrome Developer tools for this page. To access the tools go to View > Developer > Developer Tools or on a Mac hit command+option+i.
The other reason we want several browsers is for testing our sites. Before you ever deploy a site on the web, you test them using a browser on your local machine. I always test my web sites in Chrome, Firefox, and Safari to make sure everything looks good. I found out today that one of my sites looks like crap in Microsoft Edge. So now I test using four browsers.
Assignment
If you don’t have them already, download and install Google Chrome and either Firefox or Firefox Developer Edition. Open the Developer tools and start poking around (see the figure above for instructions). Finally try to view the source code using the developer tools. This is where the raw HTML code for the site is hiding.
If you want to practice working with the dev tools of your new browser AND learn more HTML/CSS in the process, check out the Interneting is Hard tutorial by Oliver James linked in the HTML/CSS section on the Tutorials page (also linked in the navigation bar up top).
The R Environment
R
R is both a software language and an environment for statistical computing and graphics. At some point, you will need to embrace a programming environment to analyze your data and summarize your findings using figures, tables, etc. R is certainly not the only way to do this; however, coupled with the ability to package everything in a website, I believe this environment offers a valuable suite of tools for your scientific needs. The benefits of R include; a) it is free and open source, b) its capabilities are extended through user-created packages, c) it has a huge community of users (which means it is well supported), d) it is powerful and flexible. We need R to run RStudio.
RStudio
RStudio is an integrated development environment (IDE) for the R language. Take a moment to familiarize yourself with the idea of an IDE. The text editors described above are also IDEs. RStudio is a syntax-highlighting editor that supports direct code execution, and tools for plotting, history, debugging and workspace management. We will use RStudio to create websites and interactive data products.
R Markdown
R Markdown is a file format for making dynamic documents with R. R Markdown combines the syntax of Markdown with the language and an environment of R. R Markdown documents are written in Markdown—-a “lightweight” markup language (like HTML), that uses a relatively simple syntax to facilitate the transformation of human-readable text files into .html or .pdf documents. What this means is that rather than writing HTML and CSS code to make a website, you write your content in Markdown, which is then translated (by RStudio in this case) to web content. R code is embedded within code chunks that RStudio can identify as code. RStudio/R then runs the code and renders the output within the HTML file.
Assignment
It is important to follow the next steps in order. You must install R before RStudio or any R packages.
Install R
- Go to https://www.r-project.org/
- At the top of the page under Getting Started click on the download R link.
- Select a mirror site to download R. It doesn’t matter which one. A mirror site is an exact duplicate of the main site and is there to relieve web traffic.
- If possible, you want to download and install a precompiled binary distribution. Select your OS at the top of the page under Download and Install R.
- If you have a Mac OS X just click on the
.pkgfile to download and install. Other OS require additional steps. - Test your install. Open R and type
sessionInfo(). If you don’t get an error, then the install is good.
Install RStudio
- Go to https://rstudio.com/ and hit Download.
- Scroll down and hit the Download button under RStudio Desktop Free.
- Choose you operating system and install RStudio.
Install R Packages
R packages can be found in several places including GitHub and The Comprehensive R Archive Network, or CRAN. On CRAN alone there are over 15,000 packages available. You will need a few packages to get going with your web project and you will install more as the need arises.
Before you install any packages, run the library(<PACKAGE_NAME>) command first. If you do not get an error that means the package is already installed.
Here is a list of packages to start with:
library(rmarkdown)if you seeError in library(rmarkdown) : there is no package called ‘rmarkdown’then runinstall.packages('rmarkdown'). Depending on your R install, you may have to wrap the package name in single or double quotes when installing. Just play around with it.library(knitr)orinstall.packages('knitr')if you get an error.library(DT)orinstall.packages('DT')library(ggplot2)orinstall.packages('ggplot2')
If you have problems with any of these steps, we will help. Open up RStudio and start looking around. You can personalize the appearance of the IDE by going to RStudio > Preferences. You can also download a cheat sheet here that contains some additional information on the RStudio IDE.
Assignment
Tutorials & Readings
Please go through the following material.
R Markdown
- Start with the R Markdown Quick Tour.
- Then go through the introductory lessons. These are really short.
- Our main resource for the course is The Definitive R Markdown Guide.
As the authors state in the Preface, This book may serve you better as a reference book than a textbook. It contains a large number of technical details, and we do not expect you to read it from beginning to end, since you may easily feel overwhelmed. Instead, think about your background and what you want to do first, and go to the relevant chapters or sections. Read Chapters 2 & 3
Now grab a few cheat sheets for your reference (available as pdfs). Go through these so you can start getting familiar with the syntax and utility of the tools.
- RStudio IDE Cheatsheet. This sheet gives an overview of the RStudio IDE.
- R Markdown Cheatsheet, A general R Markdown reference.
- R Markdown Reference Guide. A more detailed R Markdown reference. Pay specific attention to the section on Chunk Options. Chuck options are how we specify the way our R code is processed.
GitHub
To understand GitHub, we first need to know a little about git, the open-source version control system that GitHub is built on. What does that mean? Think about the last paper or grant you worked on. You open a Word document, start typing, and at some point you have a draft. Now you send that draft to a co-author and they make a bunch of edits using track changes and send it back to you. Maybe they cut some text, make some corrections, add a table. You really like some of the text they cut from the original draft. You can’t leave that text in the new draft but you don’t want to delete the original draft. So, you save them both and now you have two versions, both of which contain slightly different information. Each time your draft goes through a revision you have a new version, and at some point, you have no idea what the difference are between each version. Out of control.
Now imagine that instead of a single document, you have an entire R Markdown website full of dozens of files, each with hundreds of lines of code and text. A single change in the code can wreck the whole site. Like the document example above, you could save every single version, no matter how subtle the difference. But I think we can all agree that would be insane.
Enter version control with git and hosting with GitHub. Git is a version-control system for tracking changes in source code and GitHub is a web-based hosting service (or hub) for the versions. You can use git without GitHub, but you cannot use GitHub without git. Let me show you what this looks like in practice.
You have a project on your computer, a website for example. You fill pour a cup of coffee and start coding away on your website. At some point you stop because it’s 2am and you can’t see straight. So, you fire up a terminal and use a few git commands to send the project to its repository (repo for short) on GitHub. Now you have two identical copies of your project, a local copy and a copy on GitHub. The next day you wake up with a new idea and start coding away again. Now the local copy is different from the repo copy. You again send the project to GitHub but this time the changes are recorded.
Check out this image from one of my project repos on GitHub. Any document page you vist on GitHub will look like this. In the upper left is the repo name (projectdigest) and the name of the file, in this case 0_pw_intro.Rmd. Based on the .Rmd extension we know this is an R Markdown file. In the bottom right of the screen shot there is a history button.
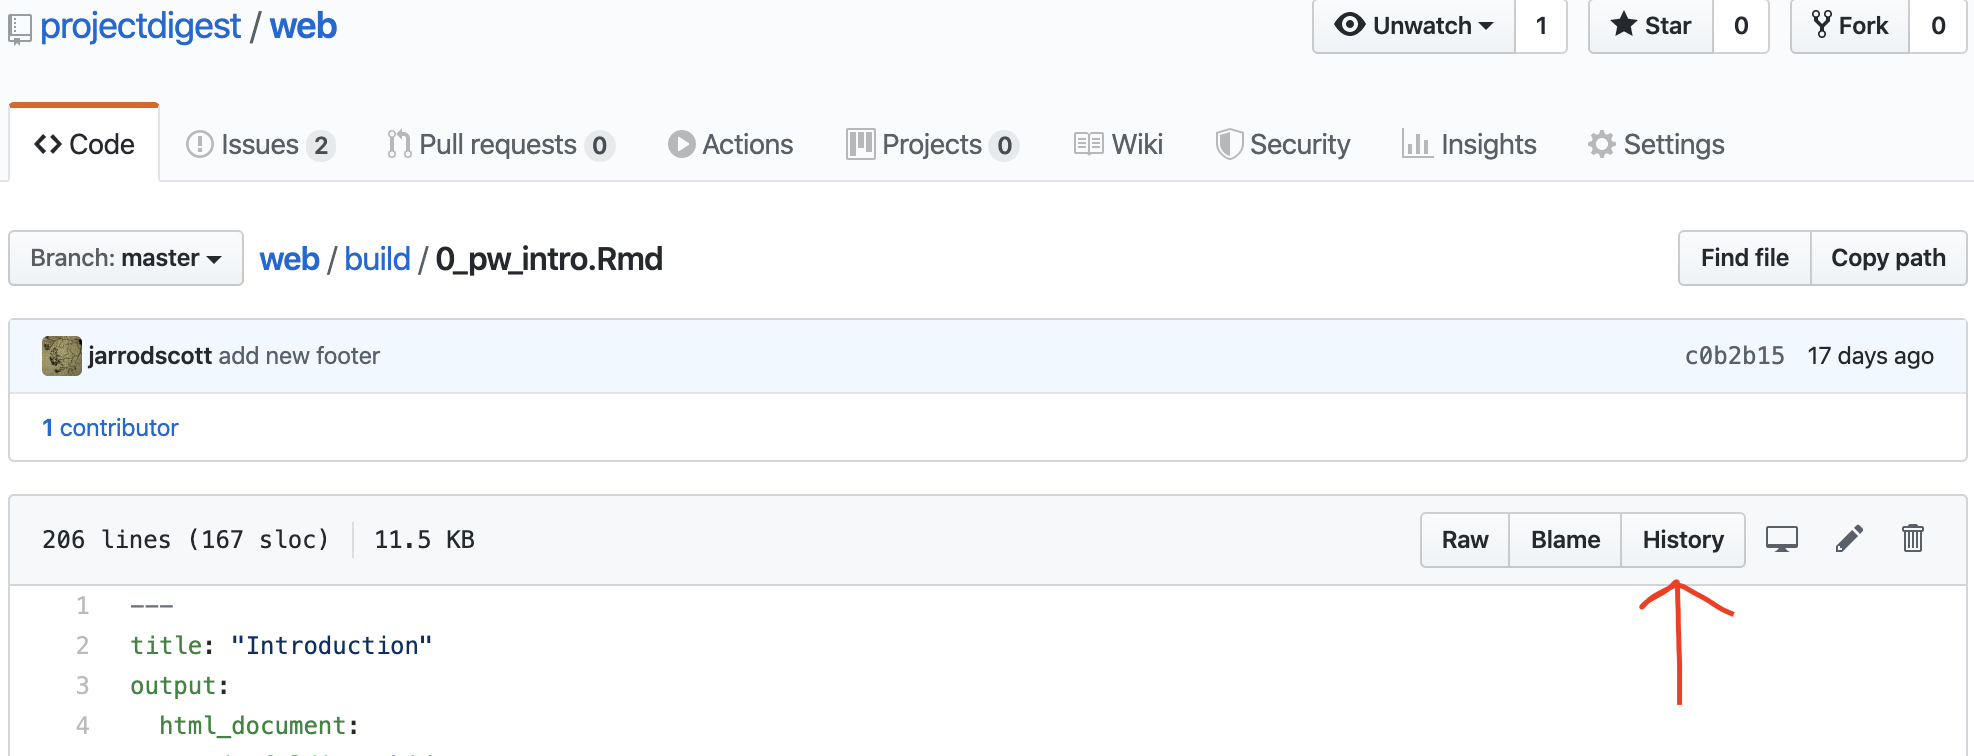
GitHub page for an R Markdown document.
Click on that and you see the full history of that file. Every time you make changes to your local copy and send those changes to GitHub are recorded on the history page. These cahnges are called Commits. Each commit has a unique identifier generated by git and any comments that you attach to the commit. One thing to notice is that my commit comments are completely useless because they are vague. You want to include comments that have a specific meaning. What does Update tell me? Nothing at all since everything is technically an update. Make sure your commit descriptions are descriptive :)
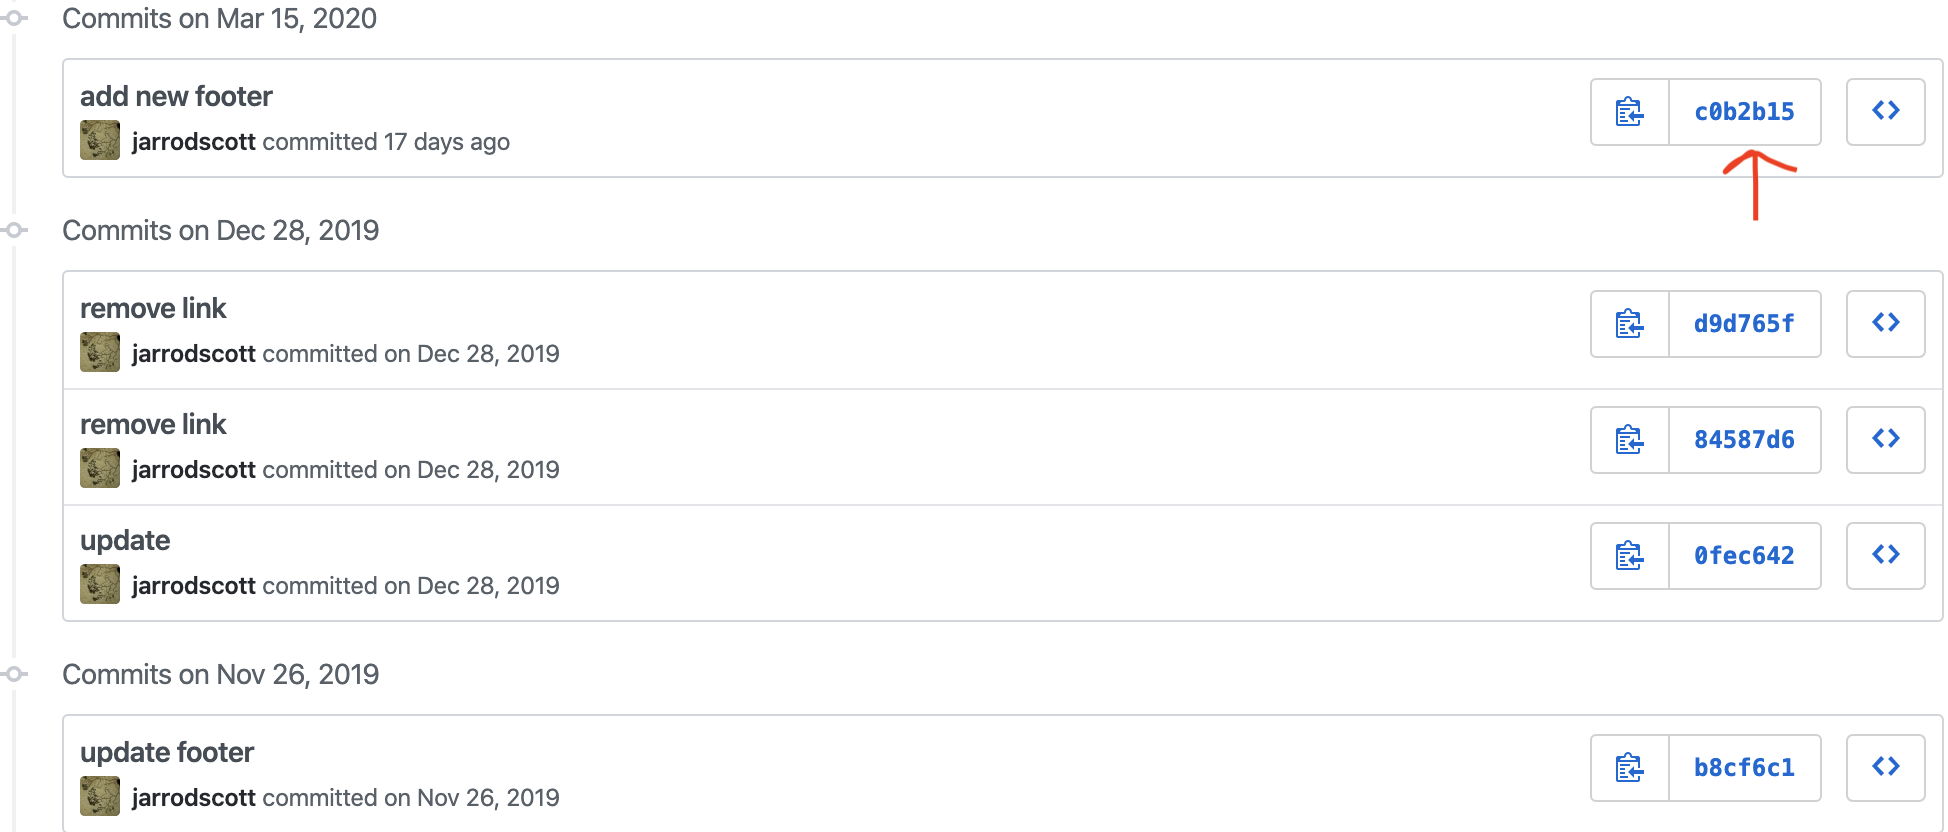
The commit history page.
Clicking on one of unique IDs takes you to the page that documents the changes made during that commit.
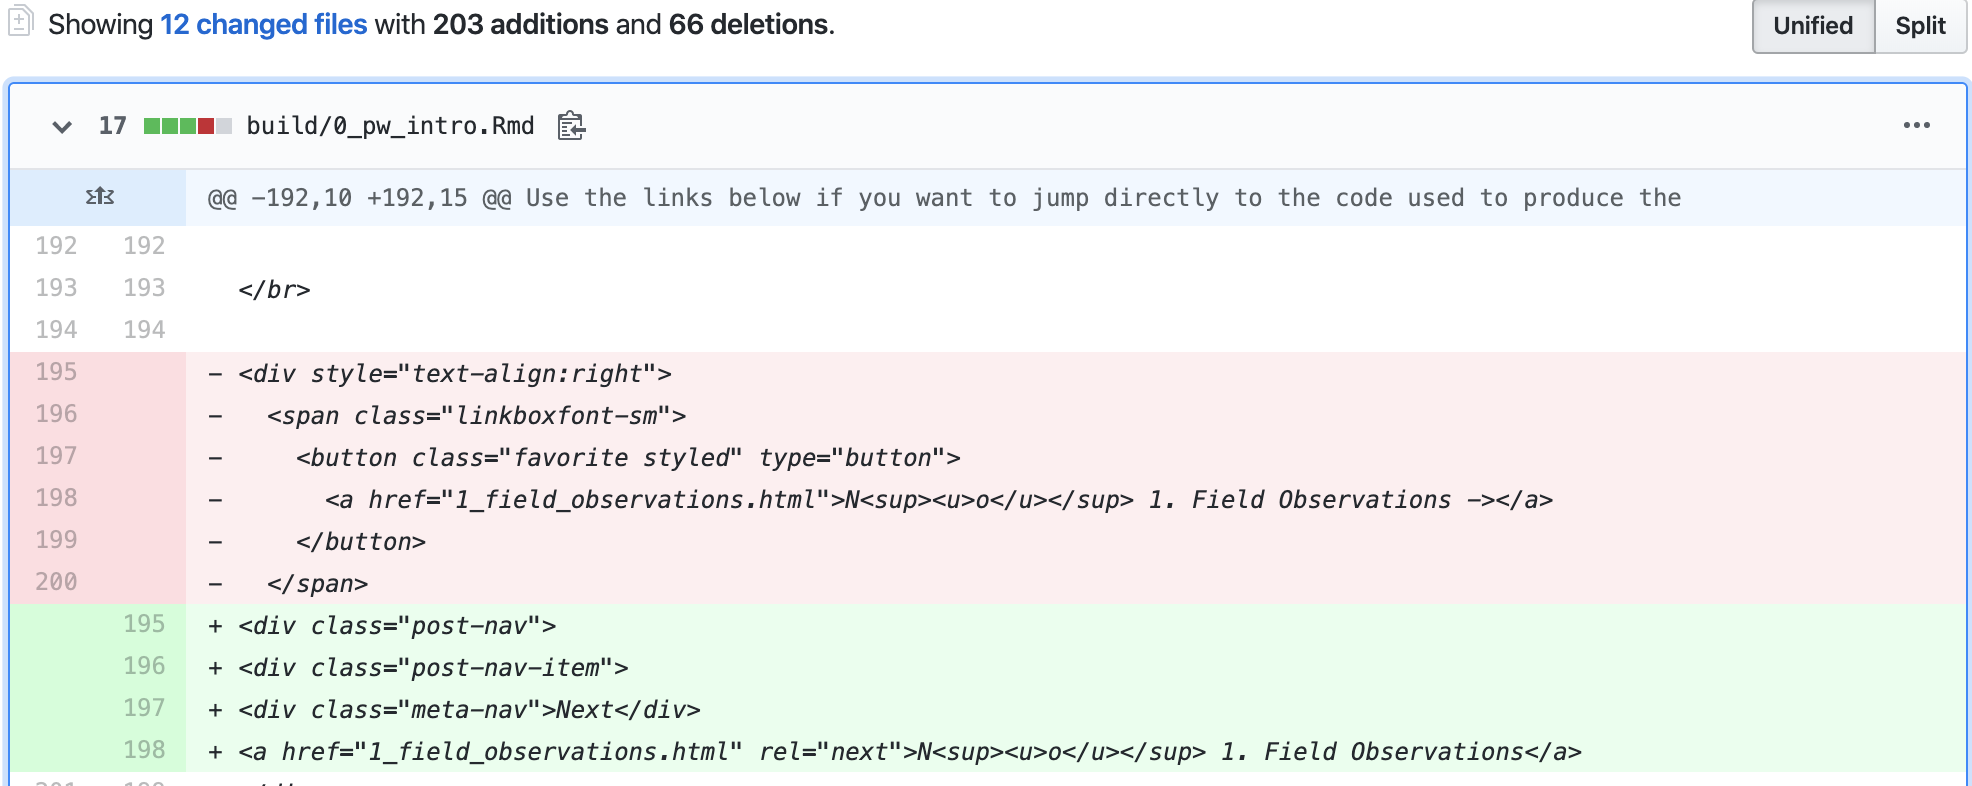
Documentation of some changes that occured to 0_pw_intro.Rmd during a commit.
It looks like I changed 12 files during this commit. Remember, we are interested in the changes to 0_pw_intro.Rmd but those changes were part of a larger commit where 11 other files also changed. Each of those files and all their changes are described on this page. Looking more closely at the image, you can see I deleted a block of HTML code (in red) and added some new code (in green).
GitHub adds many features not available in git. GitHub is a graphical user interface (GUI) while git is a command-line interface (CLI). GitHub also offers a service called GitHub Pages. GitHub Pages allows you to host a website from a GitHub repository. This is how we will host our web products. But for now don’t worry the details, we will get into git and GitHub in subsequent lessons.
Assignment
For now, I want you to sign up for a GitHub account. Once you have an account, go to the page from the example above and repeat the steps I outlined. You can find that page here. FYI you don’t need an account to access the page. You will be spending a lot of time using these tools–we will learn how to use git/GitHub in parallel with our work on R Markdown. Learning how to use git/GitHub can be a little daunting at first, primarily because the terminology is sometimes not very intuitive. But it is an invaluable tool for our work.
PS. You also need to install git but we will leave that for a subsequent lesson.
Concluding Remarks
I wanted to leave you with a few final thoughts. I made my first commit to GitHub a little over a year ago with my first web product, a single page R Markdown HTML document. I am a microbial ecologist, and I was collaborating with four reef ecologists on a project about fish and microbes. Anyway, long story short, they were having a hard time understanding the microbial data, or I was not doing a good job of explaining it. So I made an HTML page outlining every step of my analysis, including all the code and results that I emailed to my collaborators. My collaborators were so excited that they started sending me additional material to add to the page.
As the amount of material paper accumulated, the single page turned into a project website. I made a GitHub repo for the site and used GitHub Pages to distribute site over the web. The I did my best to document everything we did in that study. When we submitted the paper, I included the project website as a place where people could find information not included in the main paper or supplementry material. During the revision process, I was able to quickly address reviewer comments because I could pull material directly from the website without having to dig around in the depths of my computer.
The paper was published today :) and here is what it says in the Data accessibilty section.

Screen shot of the Data accessibilty section from the publication.
Click on the image to check out the project website. Here you will find access points to the raw data, the website code on GitHub, workflows that include R code, and many other bits of information. The site is nothing fancy but the entire project is now archived on the web.
I learned by doing and that is my goal for you in this course. I also use R Markdown for presentations, my CV, and professional letters. Along the way, I have gained a lot of experience using other languages like HTML, CSS, and Hugo for my projects.
And that’s it for this lesson. See you on Slack.